#Image Format Selection
Explore tagged Tumblr posts
Visit Tumblr Blog
Explore Tumblr blogs with no restrictions, modern design and the best experience.
Last Seen Tumblr Blogs


Fun Fact
70% of Tumblr users say the Dashboard is their favorite place to spend time online.
Text
#PNG vs JPEG#Image File Formats Comparison#Image Compression#Lossless Compression#Lossy Compression#Graphic Design#Image Quality#Digital Images#Image Format Selection#Visual Content#Image Optimization#Web Graphics#File Size Reduction#Digital Photography#Multimedia Formats#Transparency in Images#Visual Effects#Image Loading Speed#Image Compatibility#Format Choice
0 notes
Text
How to Use Our AI to Human Text Converter?
Are you struggling with AI-generated content that sounds robotic and needs human refinement? Our AI To Human Text converter is the perfect tool to transform AI-generated text into human-like content easily. Follow these simple steps to start converting your AI text for free:
Step 1: Visit Our Website
First, head over to our official website at aitohumantextconverter.in. No need to log in or sign up—just visit and start converting instantly.
Step 2: Paste Your AI-Generated Content
Once you’re on the site, paste your AI-generated content into the designated text box. This is the content you want to humanize using our converter.
Step 3: Select Language and Fill the Captcha
After pasting your content, select the language of the text and complete the image captcha code. This step ensures secure and spam-free usage.
Step 4: Click the Convert Button
Now, simply click the Convert button. Our AI text converter will start working on transforming your AI-generated text into a human-like format.
Step 5: Get Your Humanized Text
In just a few moments, your AI-generated content will be converted into a human-readable format. The tool uses advanced algorithms to make the content sound natural and fluent.
Step 6: Enjoy Unlimited Conversions
That's it! You can use our AI To Human Text converter as many times as you like without any restrictions. Enjoy the convenience of free, unlimited text conversion.
#AI to Human Text#AI to Human Text Converter#AI-generated content#humanize AI text#free AI to Human Text Converter#convert AI-generated text#human-readable format#AI text converter#secure usage#spam-free conversion#text language selection#image captcha code#unlimited conversions#natural-sounding text#fluent content conversion
4 notes
·
View notes
Text
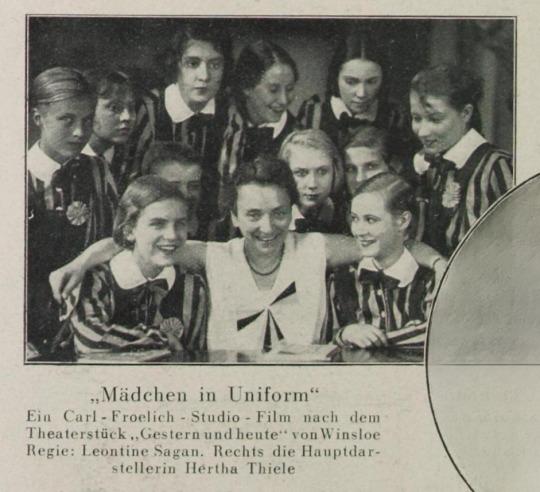

#Mädchen in Uniform#Madchen in Uniform#behind the scenes#Leontine Sagan#Annemarie von Rochhausen#Doris Thalmer#Hertha Thiele#Charlotte Witthauer#new format of posts has only text post so no 'filter by' search in archive#but old text post format works in old versions of mobile Chrome (desktop mode is on)#hopefully it's a photo post this way#Ellen Schwanneke#<— probably#IF NOT AN OLD VERSION OF TUMBLR APPLICATION the images couldn't be arranged at all *despair*#if to select all images at ince they are ordered randomly teo in a row mostly#* at once | two
5 notes
·
View notes
Text

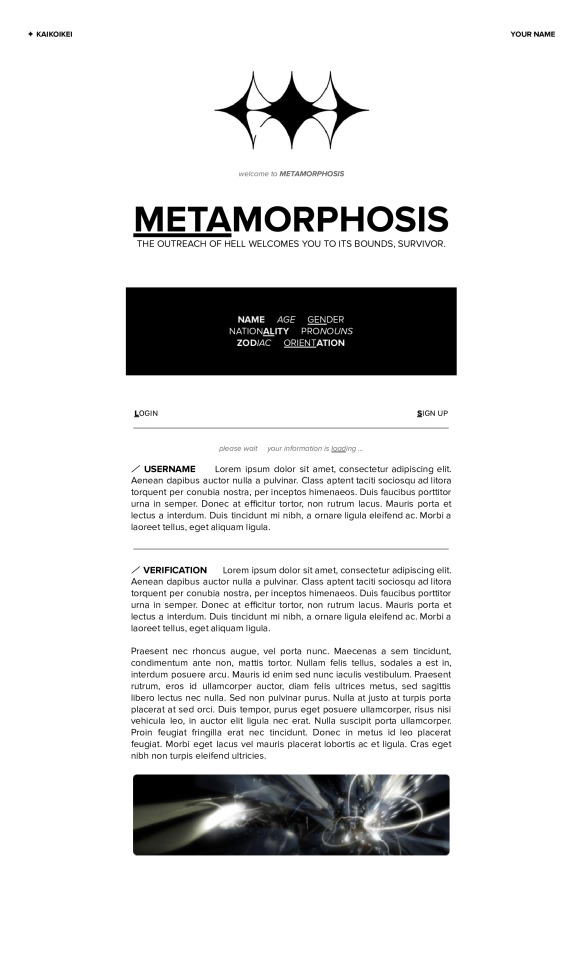


( 𝗠𝗘𝗧𝗔 )⠀𝖬𝖮𝖱𝖯𝖧𝖮𝖲𝖨𝖲
/⠀free gdoc template
⠀⠀a⠀/SITE THEMED⠀prose & muse template — to imitate a minimal black & white site with compact formatting and text. it's meant to be very simply to use with extreme comfort with customisation and utility. ⠀⠀<METAMORPHOSIS>⠀comes from an old server, accompanied with sci-fi themed remarks of distant humanity and anomalous backgrounds ― notations based off of a lack of humility inspired by ihnmaims.
⠀⠀⠀⠀𝗖𝗨𝗦𝗧𝗢𝗠𝗜𝗦𝗔𝗧𝗜𝗢𝗡 !
⠀﹙ ✦ ﹚⠀images with rounded corners are drawings. ⠀﹙ ✦ ﹚⠀every page has a separate table, and each are utilised by the "Table Options" > "Quick Layout" > "Centre". to make a new table on a new page, just select the whole table from another page, copy-paste and centre it through the quick layout. ⠀﹙ ✦ ﹚⠀it's meant to be a high-contrast template, where it's best utilised with gradients or two colours. ⠀﹙ ✦ ﹚⠀it can be used for both simple writing or minimally as a character sheet due to the lack of components or sections meant for specific descriptions.
⠀⠀⠀⠀𝗨𝗦𝗔𝗚𝗘 !
⠀⠀DO NOT REMOVE CREDIT⠀the main credit source is a small four-pointed star ( ✦ ) either in the header of footer of the first page of my docs. ⠀⠀TO COPY⠀—⠀file > make a copy ⠀⠀TO COPYLOCK⠀—⠀share > settings icon ( ⚙ ) > uncheck "Viewers and commenters can see the option to download, print, and copy"
﹙ ❤ ﹚⠀feel free to like & or reblog
#google docs template#gdocs#oc sheet#rp resources#template#google doc template#roleplay resources#site template#minimal#prose template#writing doc#writing
1K notes
·
View notes
Text
Tumblr Backup Options: None of them do everything
Cheeky but true. I'll go through what's good and bad about each option though so you can decide which balances out for you.
Covered: native export, WordPress (kinda), TumblThree, tumblr-utils (kinda)
Native Export
If you go to "https://www.tumblr.com/settings/blog/yourblogname", at the bottom of the page is an export option

Once you hit the button to start the request, it will start processing. Feel free to log off, this is going to to take a few hours. You don't need to keep it open. ~22k posts took roughly a day for me. If you have a small number of posts and get stuck, you're probably broken.
When it's done processing, you can hit that download backup button and then wait some more as you wait for the zip file to download. Mine failed the first time after like twenty minutes, and then I had to start over. I think it took 1-2 hour(s) and I'm almost certain that was on Tumblr and not my internet. And that was the zip file! So make sure your computer can be on for a while before getting this started.
So what do you get?
A media folder, conversations folder, and posts folder
Media folder: Every single photo, gif, and video that has ever been on your blog or in your DMs. There is no context data attached (except for dm images which do say which conversation they're from at least), but they seem to be in chronological order because they seem to be titled by the post's ID (the string of numbers in the address bar after "/post/"). They look like "100868498227", "100868498228_0", "100868498228_1"
When you see something end with "_0" and up that means the photos are in the same post, so _0 represents the first image in the post, _1 represents the second, etc (at least, I think).
Conversations folder: HTML export files of every DM history you have on your blog. These are actually pretty well formatted, see example here.
Posts folder: html subfolder and posts_index.html file
posts_index.html: File listing every single post on your blog by post ID on its own line with no other context. Example of a line: "Post: 780053389730037760". The ID number will link to the post in the html folder
html subfolder: contains a submissions subfolder and stripped html file versions of every post on your blog. See below first what the post looks like on Tumblr, and second what the post looks like in the html folder


The way you seem to be intended to use this is to open the file index, select a post ID, and be jumped to where that post is saved as an html file, but I don't know why you would bother when the index doesn't provide any information about the posts inside it. The posts all have extremely minimal formatting. See a reblog chain below.

Notice I said ALL posts on your blog. Photo posts without a caption will just have a broken image icon and then the date and tags. Theoretically, it might be that if you unzip the entire export folder that allows it to automatically link to the image saved in your media folder. I have no fucking idea, unzipping the folder was estimated to take two hours so I didn't do it. Let me know if you do though so I can update this post!
The submissions folder is such a rabbithole I made a post just on it but long story short it's asks you haven't replied to
What do I see as the main reasons to opt for this option? 1) you don't want to download any programs or files from the internet just to backup your blog, 2) your blog is relatively small, so digging through the ID files isn't a big deal, 3) you mostly just want to download either the images (which will be browsable via thumbnail previews in the media folder if you unzip it) or conversation history, which are fairly well formatted, 4) you don't need to update your export often/ever, because you'd have to request it from the start and download the entire thing all over again, 5) you want to be able to read your text posts clearly and don't care about preserving the full formatting, and/or 6) you don't plan to reupload this information elsewhere (say on... a WordPress blog)
WordPress Automatic Ex/Import
Move your post's from Matt's right hand to his left! WordPress (another product of Automattic) has a native Tumblr importer found under your WP Admin dashboard for your site under Tools > Import > Tumblr.
How does this work? No idea! I hit import 2 days ago and it has done nothing. Maybe I'm stuck, maybe it's permanently broken. It says to contact support if it's been over 24 hours but they don't make that easy. I disconnected from Tumblr (you can only port over a blog you have the login of) and reconnected and it still said it was importing. I don't think it's ever going to do anything.
Presumably it's supposed to 1:1 import every post on your blog onto the WordPress site, which will result in a whole lot of stolen art because there's no way to select just your original posts. Also, you'd need enough storage on your webhost to house all the posts (this honestly might be my problem, but I was planning to delete all the non-original posts once it imported.... anything and backfill what it didn't get to). The one thing I'll say about this option is that it's the only one I've seen so far that exports drafts and queues as well.
I mean, if it exported anything. If this ever does anything I'll update this post, but either my blog is too large or this tool isn't totally functional anymore.
TumblThree
(previously TumblTwo, etc)
TumblThree is an all-in-one program requiring no extra downloads beyond the main Zip, and was last updated fairly recently at the time of this post. In order to run it, unzip it into one folder and run the main .exe. It has a full UI interface with lots of very descriptive helper text to help you select the right options for you without looking at the wiki. I think it's user-friendly for non-tech people.
There are a lot of options in TumblThree to change what output it gives you, but I'm going to start with the largely universal parts first:
Everything from one blog will be exported to one folder, no subfolders or sorting. As a result, the output is very messy and difficult to wade through, but post metadata and the photos are named in the same way so you can scroll, see an image preview, and then click on the metadata txt for that post and read the caption.
Depending on your settings, you can export all photos, videos, text posts, etc as their own files or exclude them from the export entirely. For the different types of media posts, you can independently select if you what to download just the media, just the metadata for it (everything that surrounds the post when you see it on Tumblr, such as the caption, OP, tags, etc), or both.
Master txt file: For every type of media metadata you export, a correspondingly named txt file will be created (images.txt, answers.txt, etc) that contains the text/metadata of every post of that type in one txt file. This is also the default behavior for exporting text posts.
Note: for text posts (which includes asks/answers), it only creates a master txt file if you do not select "Save texts as individual files", in which case it will only save each text as an individual txt file and not make a master file.
The formatting on these files is so brutal I won't even give examples, but they're unreadable. Being a .txt file, there is no native formatting, so it exports in html formatting.
Example: instead of a post that says "I want to go swimming", it exports: "I want to go < b >swimming< / b >" (minus the spaces around the b) as the post body, which is a big part of what makes it unreadable, because there are a lot of hyperlinks in all the header information listed below.
Each post in the master txt exports with: Post ID, date, post URL, slug, reblog key (no idea what that is), reblog URL, reblog name, title, [the text/caption itself], and tags.
Theoretically this means you could ctrl+f "cybertrucks" in the master txt file and then browse all your posts making fun of Tesla owners by tabbing through the returns. This is not possible with any of the previous options, and only is possible because it's all in one file, as ridiculous as it is, which is why getting that master file is so important.
For the trick to get both the individual text posts and master text.txt & answers.txt file, as well as my recommended settings and details on how updating backups works, see the read more at the end of this post.
The images.txt includes all the information listed above, but with the following additions: photo url (NOTE: this is the url on Tumblr, not a link to where it is in your folder), photo set URLs, photo caption, and "downloaded files" (NOTE: this is the name of the file it has downloaded)
The video.txt is similar to the above
The use case for this would be similar to what I described for text posts above: search keywords from captions, tags, etc and when you find what you think is what you want, copy the name from "downloaded files" and search your folder to find the actual image
I really hated TumblThree's output the first time I looked at it and then I realized the single file is the only way to make browsing tags workable, because otherwise you would have to have a folder for every tag, and posts with multiple tags would have to be duplicated between them. I'm not pressed on finding a txt to HTML converter right now but it could be an option in the future if you wanted to make things more readable.
Okay, let's get into the non-universal stuff you can customize in settings, because it's like, everything:
File names: We've already established you can search with the downloaded file name for images, but what will that be? Whatever you fucking want. Post date, reblogger name, post ID, post title, original file name, you can make it any and all of these in any order you want! You can have actually useful file names! Personally I like %e_%p_%q_%i_%x which exports as DateTime_PostTitle_BlogOriginName_PostID_IteratingNumber (note: you need some kind of unique iterator to be valid so two files don't have the same name, such as multiple photos from one post). Look how much searchable information that gives me, in chronological order! It decreases your need for the master txt file.
Tip I wish I thought of before doing my massive export: make one of the unique headers from the master txt file part of the exported file name so it's easy to search for it after identifying it in the master file.
Files scanned: this is the only method I've found that lets you back everything up, remember what it backed up, and then lets you add any new posts since that date without having to download the whole thing again. That's a game changer, but see the read more below for limitations.
You also have the option to rescan the entire thing if you want.
Post type: T3 (I'm abbreviating it now) also lets you export just your original posts, just reblogs, etc - again, giving you the most control of any options. It also lets you export replies. I, uh, would not do this because if you have any popular post on your blog it might have hundreds, or thousands of replies but hey, you can do it!
You also have the option to only download posts with a certain tag.
Blog options: You can export literally any blog you have the URL of. In fact, if you copy a blog URL while it's open, it will automatically add that blog to its UI and create an empty folder for it. It makes it easy, no private key required. I do have mixed feelings about the concept of exporting someone else's blog... but I'm also planning to do it to some of Crew-ra's blogs so... my digital horde must grow.
You can also queue blogs up and leave it to run through a lot of them. It is a lot faster than Tumblr's native export, I started this import well after I started typing this post and it took a few hours, probably not all that much longer than just downloading Tumblr's export took (and that's while running it alongside other data copy operations because I'm backing up a lot of stuff right now).
I do recommend doing a test export with a sideblog, I was able to use wild-bitchofthenorthwoods as a test import since it only has one post and it has media, so it was super quick.
(I do want to note, I think the number of downloadable items starts out matching the number of posts on your blog without scanning them until you start the export - but if you choose to export everything as its own file, you're going to end up with way more than that because a post with three images would be multiple files)
Things T3 cannot export:
Since in its simplest form it's just accessing the public upload of your blog, it cannot export your drafts, queue, or conversations
It cannot export posts as HTML files, and thus cannot export them with readable formatting natively
What do I see as the main reasons to opt for this option? 1) you don't care about exporting your DMs/conversations, 2) you want the ability to export only certain kinds of posts (original, photos, using a tag, etc), 3) you want to control the titles of the exported files 4) you don't mind wading through massive folders, 5) you want the ability to search tags (using the txt files), 6) you want the ability to update your export without starting over from the beginning, 7) you either don't want to reupload this information somewhere else, or you want to upload it somewhere that supports automatic HTML conversion (for instance, you can switch a Tumblr post from a rich text format to HTML, same with AO3, so you can put it in as HTML and then hit post to see it turn into a rich format. This techically makes T3 the most versatile/useful export option if you're planning to do anything with it other than browse your own files).
tumblr-utils
Full disclosure: haven't tried this one. But others have! tumblr-utils is a no-UI, python-based backup software. This means in order to use it you have to type commands into the terminal. If you don't know what I just said, don't use this one.
If you do, you'll need to separately download python and youtube-dl just to get this one running. You'll also need to give it your personal Tumblr API key and feed it commands deciphered from the wiki page I linked. Here are two different guides people have written on how to use it. Output:
Obviously I'm guessing based on the documentation, but one thing that is nice is this tool allows you to save each post in its own folder. Presumably each post is multiple files like we saw with T3, so this would make it easy to group them, but it also means you'd have to look in every single folder to find anything.
It seems to break posts up into timestamp folders by month, again, helping with management to narrow down where you have to search
It allows you to save only certain kinds of posts at a time like T3
It allows you to backup posts only from a certain time period (so if you keep a little .txt note of the last time you backed up, you can easily add only the new posts into your backup without having to start over from the beginning)
It allows you to only save posts under a certain tag like T3
It allows you to save only original posts
It's the only one I've found that lets you back up your liked posts
What do I see as the main reasons to opt for this option? 1) you don't care about exporting your DMs/conversations, 2) you want the ability to export only certain kinds of posts (original, photos, using a tag, etc), (okay now we get to the points that aren't also covered by T3), 3) you want posts to export already broken into folders, whether by post or by month, 4) you want to back up your likes, 5) you don't care what file names look like, 6) you're comfortable with the command line/coding and don't need a UI.
Summary:
None of these options are ideal for reuploading your files anywhere (except WordPress), but I do think TumblThree is the best of the options because of the written HTML formatting in the txt files being useful for websites that support automatic conversion (or require HTML input).
For starting another blog, WordPress wins. If it works. I'm trying to be generous here.
For searchability, T3 wins again.
For versatility... yeah you know it's T3, but tumblr-utils has a lot of the same features, too!
For sentimentality (aka conversations), it has to be the native export. There literally is not any other option.
For queues and drafts, the only theoretical option is WordPress. If it works.
For likes, the only option is tumblr-utils.
Every option does something the others don't, so theoretically to cover everything, you have to do all four options. Actually I would say do the native export if you don't have a lot of posts and aren't a freak like me, check it out, and if it doesn't work (I know it's finnicky) or you don't like the export, go with TumblThree. This also means you'll at least have your conversations even if you don't end up using the native export any other way.
And I wish it could go without saying, but don't repost people's shit, y'all. I'm backing up everything for my records only and it will never be shared with anyone else, or even browsed as long as using Tumblr instead is an option.
TumblThree adding to old backup quirks, recommended settings, & master file backup solution:
Adding to backup quirks:
From my tests, when you scan a blog you've already backed up to just add new posts to it, it does not update the master file, so if you want to update it, you'll have to do the steps I list at the end of this post. It might be possible it does update if you force rescan, but I highly doubt it.
If you scan a blog you previously backed up under more restrictive settings - say you only backed up original text posts as one file before and now you've selected to back up absolutely everything - it will only download up until the time you last backed up that blog. It will not blow past where you last downloaded to download all the photos and videos it didn't get before just because they're selected now. This is great for doing after using the master file solution I'm showing below, but if you do need to download everything after doing a more restrictive scan, you can once again follow the first few steps below to do so.
Recommended settings:
This will obviously vary by what you're trying to do, but one or two things weren't immediately obvious to me and I did say I think this was the best solution for less technical users, so I want give my personal recommendations. Settings can obviously be found under the settings button at the bottom of the screen (you may need to use the scrollbar on the UI for, which is separate from the scrollbar on the blogs panel), but when you click on a blog, when you click "Details" in the right sidebar, you can also see your most important settings at a glance and adjust them to whatever you want them to be "per blog". I believe TumblThree remembers what you last used for the blog and applies the things in settings only to new/other blogs.
The thing that is going to vary the most is how many different types of posts you want to back up (text, video, reblogs included, etc), so I'll leave that up to you. If you're going to export a media type, though, I generally recommend exporting the metadata too.
I already gave my preferred file names above and again that's going to be something that varies a lot by people. Hover over the "Filename template" box and it will give you all the options in the legend you can combine via underscores.
Leave "Skip .gif files" off unless you're hurting for hard drive space. This removes all the gifs from your download, and the reason this is provided as a separate setting is because gifs have relatively massive files (at least compared to a text file)
I'll be honest I haven't seen a difference between turning on and off "Group photo sets". Because of the way file names work, most conventions will naturally lead to photos from the same post all being in a row.
"Save texts as individual files": if you only want texts to be saved as their master text.txt and answers.txt files, uncheck this. If you want the individual files I highly recommend you also download the master file for searching purposes, in which case my recommendation is this:
1) Select to export texts only, leaving off all media options, and uncheck the "Save texts as individual files" option. 2) Export the blog. This will only result in two files, answers.txt and texts.txt. 3) Move these files elsewhere on the computer to save them. 4) With T3 closed, delete the folder for the blog and the blog's Indexes (see instructions at the end of this post for finding these). 5) Reopen T3, which shouldn't remember it ever saw the blog and create a new folder for it. Turn on the "Save texts as individual files", as well as any other media posts you want to download. 6) Export the entire blog again. 7) Move the texts.txt and answers.txt file back into the blog's folder.
I leave all other options on the Details tab off, except for:
"Force rescan" scans past the point it last backed up and searches the whole blog again. If you have a big blog, this is going to burn time. This is needed for the number of downloaded items in the panel to be accurate but I don't know why you would care or turn this on unless it lets you skip steps 3-4 above, but my blog is too big to burn through testing that, so if you try it, let me know and I'll update this post!
Master file backup solution:
See my 7 steps from above to skip having to do this, but if you accidentally do things out of order and then realize you still need the master files for texts post after backing everything else up, here's how you get it with minimal pain:
T3 will make an "Index" folder in both the main folder for the program where the exe is located and the destination folder where you have your blogs backing up (note: these were two very different places for me, if you just have it back up to the automatic Blogs folder within T3's folder, it might not create a second Index folder).
To make T3 "forget" what it has backed up previously so it goes through to the beginning and makes a master file that includes everything, all you have to do is remove the Index file(s) for the blog while it's closed so it doesn't remember it anymore. I backed my index up in another folder.
Check off for it to only download text posts, and then uncheck the "Save texts in individual files" option. This will cause it to only create the master answers.txt and texts.txt file on the rescan.
The combination of only going for one post type and only downloading one file for it means this rescan is relatively fast. When you look at your Blogs folder, you'll find a new folder has been created for your blog name (in my case, there was "n7punk" and "n7punk_2) and your output is in the new folder. I just moved it over to the original folder.
At this point you can restore the indexes, though I've only gotten it to half recognize them. I can get it to recognize my original n7punk folder so everything can stay there, but the total downloaded items is stuck at what it was when I did just the text posts. I don't really care, it was mainly the folder thing I wanted to fix. If you have lag between your last full backup and your master-only backup, this might cause some issues? I don't know because I made sure there wasn't lag, so I recommend doing another backup to add any missing items before doing this method.
You can also use this technique if you want to download only your original posts and then download everything else to a second folder. Adjust the setting to only download original posts, download the whole blog, close T3 and delete the indexes, rename the folder to whatever you want ("n7punk_original", etc), and then reopen T3 and set it to download everything and run it again from the start.
#tumblr#automattic#words and things#tumblr hacks#resource#tumblr-utils#tumblthree#100#posts that haunt me#in a good way back up your shit yall lol
436 notes
·
View notes
Note
literally how are you doing the gradient text thing. i need to know.
✨ Snappy's Gradient Text Tutorial
You might have seen me use gradient text in a few of my artworks, and it is a great tool to make a posts tand out! I learned from this post, but find some of the information outdated, so I am making a tutorial of my own!
To my knowledge, this is only possible via desktop mode* (mobile method at end), but not the app, as access to the HTML function is necessary. Alongside that, you need access to a text color fader! There's a few options out there, but I use:
Patorjik's Text Color Fader
Let's get to the tutorial!
Have the text you want to turn into a gradient ready and copy it to your clipboard.

2. Open the text color fader and paste your text into the box labeled "your message".
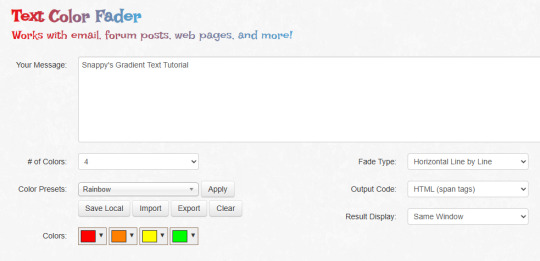
3. For the most basic gradients, you may ignore the boxes on the right. The leftmost boxes allow you to choose between preset colors or making your own colors.
Tip: if you are making a gradient for something such as art, I reccoment grabbing a few hex codes from the image to use for your gradient. This allows you to have control over your colors. You may also save a pallet if you want to use it again

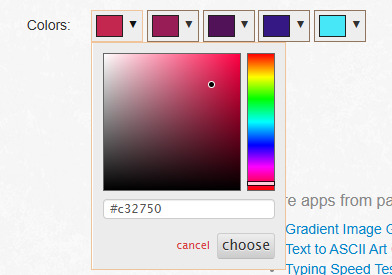

4. When you are happy with your colors, generate your text.

5. You will be brought to this page. If you are happy with the colors, click "select all" and copy the HTML to your clipboard.
TIP: check your text against both a dark and light background to ensure it will be readable to viewers on dark and light mode. If it is not you can tweak the colors by choosing "create new fade".

6. Open Tumblr again and open your post. At the top right there is a grear icon. Click the icon and scroll down to the text editor. Change the setting from "rich text" to "HTML"


7. When you move to HTML, your post will look very different! In the HTML, your goal is to find the text you want to replace in the code.
TIP: If you can't find it, use "Ctrl + F" to open the keword search function and it will highlight your word.
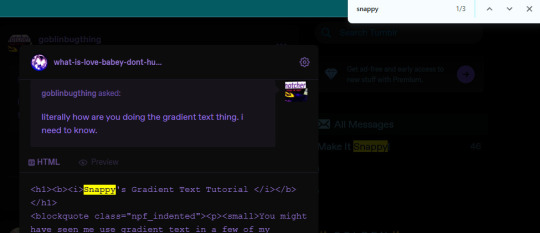
8. Highlight your plain text, right click it, and paste your HTML from Patorjik into the space.
TIP: The HTML is a confusing mess to look at. Click the "preview" tab to check if your code worked


9. You should see a gradient when you swicth modes!

If the HTML broke your formatting, you can edit it in the preview mode. Once you have done a gradient a couple of times this process is very easy and takes LESS than two minutes. It looks intimidating but after you get the hang it is very achievable! I believe in you guys being able to do it. Happy gradient texting for you guys!
*EDIT: It is possible via mobile through the method of entering your account on a web browser and putting it on computer mode, then following the same process. Reportedly it is less comfortable but it works, thank you to chocokeyboard for letting me know!
#sent to snappy#asks#snappy speaks#web resources#tumblr resources#gradient text#tumblr tutorial#gradient text tutorial#loveee doing this for my posts it adds so much#if anyone DOES know if it can be done on mobile let me know! I will edit this post to include it#EDIT: mobile method found! to my knowledge not app compatable but if anyone knows how to do it via app let me know and I will include it!
213 notes
·
View notes
Text
🥏 Where to find good XF fanfics
👽 On Tumblr
@lilydalexf has an encyclopedic knowledge of fics and continues to be an invaluable resource. You'll find a boatload of themed fic lists, individual rec posts and helpful answers to anon asks.
@txf-fic-chicks-blog seven years of almost daily recs, with well-written blurbs and a lot of fun, run by @kateyes224 and @piecesofscully. Look out for their themed days: "Casefile Monday", "Tumblr Tuesday", "Editor's Pick Wednesday", "Post-Ep/Missing Scene Thursday", "Novel Length Friday", "Smut Sunday", and the very cool "Because You Watched"
@msrlibrary a well-tagged library of MSR fics; each entry includes a short excerpt and a nicely chosen image from the show.
@201daysofxfiles a rewatch blog by fandom veteran @wendelah. Each episode in season 1-7 is paired with its own fic rec post.
@enigmaticxbee an aesthetically pleasing and neatly organized rewatch blog that is packed with great content, including excellent fic rec lists categorized by season, story type, trope, and more. Each episode guide sometimes features related fic recs.
@thatfragilecapricorn30 posts one fic rec every Friday, accompanied by a nice writeup.
@randomfoggytiger curates many fic rec lists sorted by often fun and creative categories.
@cecilysass has a google doc titled "fics I love", which is a fantastic fic list categorized by story type, complete with thoughtful blurbs. She's also shared two episode-related fic rec lists on Tumblr: here and here.
@pookie-mulder writes a monthly fic journal with good recs.
**self-promo plug** I post fic recs on my Tumblr blog @fine-nephrit under #nephrit's fic rec. Plus, I reblog others' fic recs that I come across!
👽 Rec Communities
XF Book Club: the best thing ever, an absolute gem that deserves to be preserved for posterity. During its run, 270 fics were recced and discussed in depth here. The community's intelligent and insightful comments on this blog are sometimes even more enjoyable to read than the fics themselves.
The Fic Filter (xf tag): well-curated selections with short blurbs.
Multifandom Het Recs (xf tag): a major rec site's xf section that offers nice "why this must be read" writeups. @het-reccers
Crack Van (xf tag): another major rec site with a big xf section, featuring endless recs and blurbs
Fancake (xf tag): another major rec community's xf section boasting an extensive thematic tagging system
👽 Personal Blogs
Emily Shore aka Naraht: meta essays, fanvid recs, fic recs—great stuff aplenty
Bad for the Fish aka Scarlet Baldy: fantastic fic list paired with highly enjoyable reviews and analyses of the fics she's read. @badforthefish
Ramblings of a Mind Untamed: reviews of a dozen or so classic fics
xxSKSxx XF Fanfic Recs: still active in 2024! @xxsksxxx
X-Libris: more of a fic library, this is the best place to download nicely-formatted ebooks of pre-AO3 oldies. What I love most is the incredibly detailed and extensive tagging system.
👽 Individual Rec Lists with good writeup
Character Manifesto - Dana Scully: a character analysis and 10 Scully-centric fic recs, categorized by "best of .." selections. Amazing format and choices!
Character Manifesto - Fox Mulder: same format as above for Spooky
bachlava's awesome fic rec essays, covering classic fics and slash fics
ShipRecced blog's classic MSR fics and newer MSR fics recs
luminary's 16-fic rec post
RivkaT recs fics and writers @rivkat
Anna Otto's favorite stories
Syntax6's rec list on her site, great rec list on Tumblr and FTF rec list @syntax6
👽 90s Old School Rec Sites
The Basement Office - Musea: a treasure trove of extensive fic lists with lovely written blurbs, recced by a group of talented writers from back in the day
The Other Side - Fanfic Recs from Beyond the Grave: a large collection of 'scary' or 'spooky' story recs with nice blurbs. Beautiful web design.
the Rookery - Favorite Authors: nice commentary on a list of classic fic writers
X-Files Fanfiction 101: an intro guide to fic categories and what to read for each
The Primal Screamers: a fun site run by a mailing list that hosts fic recs with blurbs, and a 'Coffee Talk' section full of delightful discussions of canon
Idealists Haven - Elemental Fanfic Archive: an archive with rec blurbs
Chronicle X: a large, well-organized archive with blurbs, plus a 'Can We Talk' discussion section of novel-length fics, plus a total of 46 author interviews. Simply incredible!
👽 Special Mention
The X-Files Lost and Found: a fic finder message board that is miraculously still very active today—How wonderful! Its FAQ page hosts a huge collection of well-categorized themed fic lists (not recs), including "Classics (or, Your Fanfic Education is Not Complete Until You've Read ...)".
Where do you find your next read? What did I miss? Reblog and share your favorites!
449 notes
·
View notes
Text


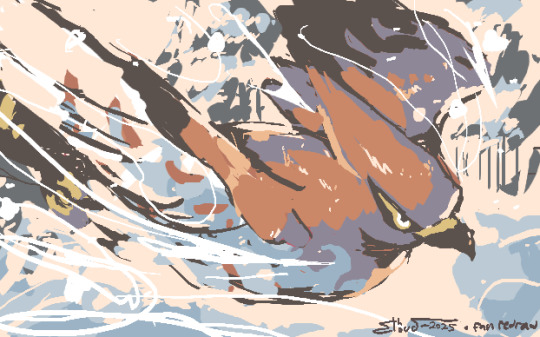
For @poketcg-art tumblr wide redraw collab !
Finally done ! we decided redraw entire card as feel basic card format should be part of the card art appeal too :] , decided draw talonflame as it one of cards we recently pulled
feel free copy how we laid this redraw card out :]
[Long ramble about thought process below]
--
When making this we started with actual card layout before drew talonflame
We measured the card and made actual canvas size match the card (2" x 3" inches) , and also wanted make text larger and clearer .
we also design in mind with feeling like a battle UI , make feel cooler when select a move :] , we replaced some bottom info (resists and weakness) with symbols to help with clarity and clutter (n also specifying the retreat Is a cost)
if you also noticed , on "stage 2" theres two dots , idea is that different cards would have different side designs ! like basic would have a vertical line , stage 1 would have 1 dot , ex would have an x , and so on . can help while going through hand 🐕
Also this goes along with the moves now being numbered , this to help with accessibility ! so someone like us who semiverbal or nonverbal (we semiverbal on much less speaking side) , you can more clearly point at a move as its framed or just hold up a number :]
--
ik this whole card layout wont work on mons with Tons of text , but it an idea wuwuw
we also very purposefully put a black frame around the art , as biggest appeal of pkmn tcg is the art , the black border helps frame the art on all normal cards
--
For artwork itself , we actually drew it directly on card canvas so "full image" is just crop
we decided just go with our usual artstyle and our own choices instead of direct redraw , brain happy :] our style is more akin to painting on 1 or 2 layers with solid brush , love swirls and stuff and that time in winter morning where light looks super warm but shadows very blue
we also thought on the "evolves from" image to make it look like enamel pin , as imo the "evolves from" images tend be really ugly and hard to see , and making it enamel pin style gives more appeal to normal cards
----
we have ton of love for formatting n design from UIs to book typesetting , and feel they are part of the art and experience , yippie 🐕
ty for reading wuww
138 notes
·
View notes
Text
For everyone who asked: a dialogue parser for BG3 alongside with the parsed dialogue for the newest patch. The parser is not mine, but its creator a) is amazing, b) wished to stay anonymous, and c) uploaded the parser to github - any future versions will be uploaded there first!
UPD: The parser was updated!! Now all the lines are parsed, AND there are new features like audio and dialogue tree visualisation. See below!
Patch 7 dialogue is uploaded!
If you don't want to touch the parser and just want the dialogues, make sure to download the whole "BG3 ... (1.6)" folder and keep the "styles" folder within: it is needed for the html files functionality (hide/show certain types of information as per the menu at the top, jumps when you click on [jump], color for better readability, etc). See the image below for what it should look like. The formatting was borrowed from TORcommunity with their blessing.

If you want to run the parser yourself instead of downloading my parsed files, it's easy:
run bg3dialogreader.exe, OPEN any .pak file inside of your game's '\steamapps\common\Baldurs Gate 3\Data' folder,
select your language
press ‘LOAD’, it'll create a database file with all the tags, flags, etc.
Once that is done, press ‘EXPORT all dialogs to html’, and give it a minute or two to finish.
Find the parser dialogue in ‘Dialogs’ folder. If you move the folder elsewhere, move the ‘styles’ folder as well! It contains the styles you need for the color coding and functionality to keep working!
New features:
Once you've created the database (after step three above), you can also preview the dialogue trees inside of the parser and extract only what you need:

You can also listen to the correspinding audio files by clicking the line in the right window. But to do that, as the parser tells you, you need to download and put the filed from vgmstream-win64.zip inside of the parser's main folder (restart the parser after).
You can CONVERT the bg3 dialogue to the format that the Divinity Original Sin 2's Editor understands. That way, you can view the dialogues as trees! Unlike the html files, the trees don't show ALL the relevant information, but it's much easier to orient yourself in.


To get that, you DO need to have bought and installed Larian's previous game, Divinity Original Sin 2. It comes with a tool called 'The Divinity Engine 2'. Here you can read about how to unstall and lauch it. Once you have it, you need to load/create a project. We're trying to get to the point where the tool allows you to open the Dialog Editor. Then you can Open any bg3 dialogue file you want. And in case you want it, here's an in-depth Dialog Editor tutorial. But if you simply want to know how to open the Editor, here's the gist:
Update: In order to see the names of the speakers (up to ten), you can put the _merged.lsf file inside of the "\Divinity Original Sin 2\DefEd\Data\Public\[your project's name here]\RootTemplates\_merged.lsf" file path.
Feel free to ask if you have any questions! Please let me know if you modify the parser, I'd be curious to know what you added, and will possibly add it to the google drive.
2K notes
·
View notes
Text
I just found out that pretty much all mipmaps in sims 2 cc are too blurry


While working on my package editor (which I'll make a post about later) I found out that pretty much all DXT-compressed textures in sims 2 cc have blurry mipmaps! Meaning that for most textures, if you zoom out slightly the texture will become blurry.
What, why, and how
Meepmops? What are those and why would I care?

Mipmaps are used in computer graphics to make textures look smoother when viewed at a distance. There is also some evidence that having mipmaps might help with texture memory (post by @episims). In essence, you take the original image and then combine four pixels into one to create an image that is 2x smaller in width and height than the original, then repeat this process until finally you get an image that is 1x1 pixel.
One complication is that mipmaps will not work if the smallest texture is not 1x1 (post by @pforestsims) meaning that if you don't have the maximum amount of mipmap levels possible, the game will only use the largest texture. This is a good thing, because that means the game will reject malformed textures, but it also means quite a lot of textures with mipmaps in cc don't actually work correctly.
That's also why you shouldn't make images which are not a power of two; if it's not a power of two you can't keep dividing the image by two to end up at a 1x1 pixel image, meaning you can't make proper mipmaps.
Why are the mipmaps blurry?
After some experimentation I've managed to find the cause of the blurry mipmaps:
All mipmaps made with Nvidia DDS Utilities are blurry. Yes, you read that correctly. And yes, it's exactly as bad as you're imagining.
For the uninitiated, Nvidia DDS Utilities has been the primary tool that sims 2 cc creators use when importing textures for pretty much as long as the game has been out. In SimPE you would click the texture, then select "Build DXT..." and that would open the dds utilities and allow you to import the texture.
So how many files are affected? By doing a scan of a 20GB downloads folder that was graciously donated to me I could get some raw numbers on the amount of textures that might be blurry. Let's have a look:
total textures: 107892
number of textures compressed in DXT: 98683 (91%)
number of DXT textures that have mipmaps: 69527 (70%)
DXT textures with not enough mipmaps to show up in game: 54709 (55%)
overall, 54709 out of 107892 (50%) of textures in this folder are blurry when zoomed out in game
How do I fix this?
Here's the good news: you can fix this! Kind of.
First of all for cc creators, let's take a look at how you can make good looking mipmaps.
The process is pretty simple: open the original texture is GIMP, export the texture, then select DDS as the format and use the following settings as a reference.

Now in SimPE right click the image, select "Import DDS..." and open the .dds file that you've just exported.
Now it is possible to do this process by first exporting the texture from SimPE, but the mipmaps that creates will never be as good as the ones made from original texture, along with it being an absolute massive time sink to do that on every single downloaded texture.
In a little while I'm going to officially release my package editor yape, which will hopefully make the process a little easier, and after that I'm going to look into adding an option into my texture search tool batl to recalculate the mipmaps for all the textures in a folder, but for now the GIMP export process sadly really is the easiest way.
104 notes
·
View notes
Text
digital notes guide part 1/5: setting up your aesthetic note-taking system 🎀


posted by: glowettee
hey study angels! ♡ mindyyy heree
omg so many of you have been asking about my digital notes setup, and i'm so excited to share all my secrets! this is going to be a 5-part series on creating the most aesthetic and effective digital notes ever. i'm going to start with the basics! this is super exciting because digital notes are literally unlimited, no wasting paper, and no perfect handwriting required.
♡ choosing your digital notebook
because the right foundation changes everything:
notion (my personal fave):
amazing for linking different pages
super customizable layouts
can embed literally everything
aesthetic cover images
databases for tracking progress
easy table of contents
goodnotes:
perfect for iPad users
feels like writing on paper
pretty digital stickers
custom paper templates
easy organization system
beautiful handwriting options
onenote:
works across all devices
infinite canvas (so dreamy!)
easy subject dividers
voice recording option
drawing capabilities
♡ essential digital tools
make sure you have these ready:
hardware needs:
reliable device (laptop/tablet)
stylus if using tablet (worth the investment!)
external keyboard (for faster typing)
good lighting for screen
comfortable study space
backup charging cables
software must-haves:
note-taking app of choice
cloud storage system
screenshot tool
pdf annotator
calendar app
backup system
♡ creating your aesthetic setup
because pretty notes = happy studying:
color scheme selection:
choose 3-4 main colors
pick 2-3 accent colors
create highlight palette
save hex codes
make color meaning system
maintain consistency
font selection:
main text font (i use garamond)
heading font (something cute!)
emphasis font
quote font
size hierarchy
spacing rules
♡ basic organization system
keep everything findable:
folder structure:
semester folders
subject folders
unit folders
topic folders
resource folders
revision folders
naming convention:
date_subject_topic
use consistent formatting
add emoji indicators
number sequence system
status markers
importance levels
♡ template creation
work smarter not harder:
essential templates:
lecture notes template
reading notes template
study guide template
revision notes template
project planner template
weekly overview template
template elements:
header section (date, subject, topic)
learning objectives area
main content space
summary section
question bank area
revision checklist
setting up your digital note system might take time, but it's so worth it! think of it like creating your perfect study sanctuary - every detail matters!
the next post will be getting into actually taking notes during class (and making them both pretty and effective!). for now, focus on setting up your perfect system.
pro tip: don't get too caught up in making everything perfect from the start. your system will evolve as you use it, just like how my notes looked completely different freshman year!
xoxo, mindy 🎀

#digitalnotes#studywithrme#studytips#productivity#studygram#studentlife#organization#girlblog#girlblogger#girlblogging#that girl#dream girl#it girl#self care#self love#glow up#becoming that girl#self help#self improvement#self development#study#studying#studyblr#college#rory gilmore#study blog#studyspo#study aesthetic#study motivation#wonyoungism
148 notes
·
View notes
Text
so i've been seeing this occasionally in the tags lately and i thought i'd bring up:
if you want someone to click or reblog your fic link you cannot simply post a link to the fic with either no description or a single sentence of description. if you do not put something beyond a link and a sentence, no one is going to click it.
part of this is basic internet safety (don't click links if you don't know where they're supposed to go), but a large part of this is that you have to catch someone's attention to make them click and leave the page they're on! people, in general, aren't going to click a link that doesn't interest them. you should interest them! so, how do you do that?
put some kind of image above your link in your post. this is BY FAR the most certain way to get reblogs and catch people's eye, but it's also the most time-consuming if you aren't already good at edits or art yourself. moodboards, little edited headers, or gifs can help you here (depending on fandom). art you've made yourself or have permission to use is absolutely the best option here, but it's by far the most time-intensive and difficult. full disclosure: i don't do this! that's because i am absolutely pants as a visual artist, even in the realm of editing or selecting gifsets. but if you have this skill and are sad your fics aren't getting attention on tumblr, this could be a potential answer!
write a summary and some kind of note with the link. there's a slightly cluttered cheat way to do this later in the list, but personally i find that formatting your fic post yourself is the best way to make these posts look good. i normally go fic link (making sure the link embed has the title) - summary of fic beneath that in a blockquote - an author's note about what to expect beneath that summary. however, everyone has different standards for how to do this! some people i know like to make sure tags and rating are present; some do not. some put some of this information beneath a cut; some do not. the main key here is to make sure there's just enough information above the cut in the main post that if i, a stranger, am browsing the tag and find your fic, i have enough information to know if it's something i might be interested in! i can always click to see the ao3 tags if i am intrigued, so it doesn't need to be all the information. just enough to catch my eye!
just post the whole fic to tumblr, including a link at the top or bottom. this is the most efficient non-art way to get notes on a fic you post, since, unlike a link with a description, a tumblr user doesn't have to leave the website to read and decide if they're interested or like it enough to reblog. however, there are two downsides. the first is that the fic almost always has to be short (~2k words if you use a cut, less if you don't), since most tumblr users aren't using the website expecting to read a bunch. the second is that doing this will mean most of your fic's readers likely will read it from tumblr, rather than following the fic to ao3. which, you may not care! i certainly don't when it comes to the ficlets i write directly to tumblr. however, it means i really don't recommend doing this with a multichapter fic.
use ao3's share button to automatically make a tumblr post. fics on ao3 have a "share" button, located above the tags and summary. this has a tumblr option, which you can then use to automatically post the fic link to tumblr. this is a bit cluttered since it includes all of the tags from the fic, alongside the full summary, rating, wordcount, etc. personally, i would then edit a little to remove some of that information so that it's more eyecatching and less overwhelming, but if you don't want to, that's also fine! that is still almost always going to be better than posting the link by itself with a single sentence to describe it, and isn't half-bad formatting-wise.
finally, you'll note my posts for ongoing chapters aren't normally given this treatment or fandom tags (although i almost always include a summary of some kind on them). this is because i generally don't want people finding my fic for the first time from a random chapter in the middle. i don't mind if they do, but i'm not going to spam the tag and i'm not going to make THAT much of an effort to make the post appealing. new chapters are things that might tell one of my followers that there's an ongoing fic they should look out for, and tell my current readers and followers that there's, well, a new chapter, but generally they aren't going to hook people. however, if you post chapters a lot more infrequently than i do, or if you simply have the energy to, there's nothing stopping you from applying these to chapter posts as well!
the thing is: look, at the end of the day, i agree with people who say you should write for yourself. how many notes you get isn't a big deal, i promise; the most important feeling is, ultimately, the feeling you get when you finish something and know you made it with your own hands. some of my favorite writing achievements are NOT my most popular, but are my favorites for reasons entirely unrelated to popularity. however, i see a lot of writers bemoaning how badly their fic posts do, when their fic posts are the ao3 embed and a single sentence that reads "this is my new fic enjoy"; the thing is, there are things you can do to make that link into something that someone is more likely to read and/or reblog! (i know i personally don't like reblogging links if i don't know their contents for the aforementioned internet safety reasons.)
just because you write for yourself doesn't mean that you can't give yourself a little leg up in finding your audience. it's worth it both for yourself and your readers, i promise.
#i always feel Weird making posts like this because i feel like they're like. influencer-y#but i do think that 'catching people's attention' IS part of writing fic! so here's a little guide on to how to post fics#hopefully this helps someone out there!#writing
215 notes
·
View notes
Text
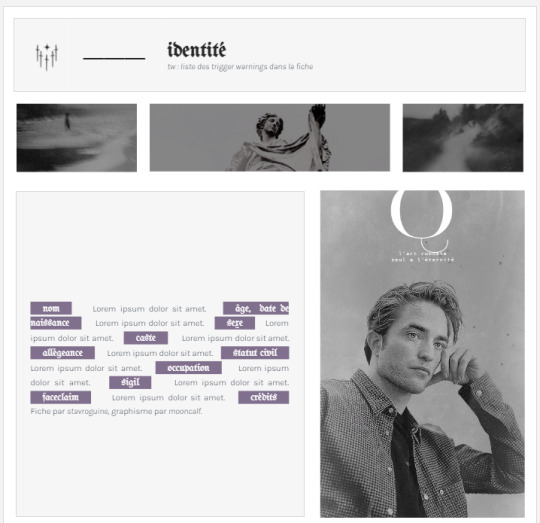
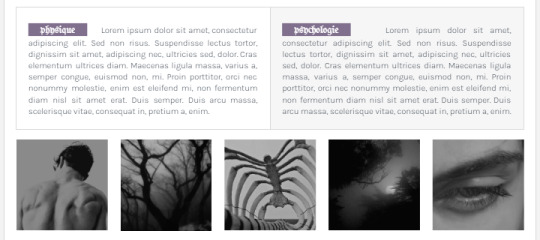

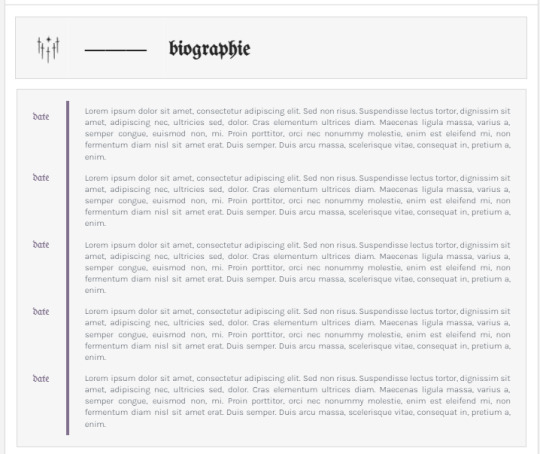
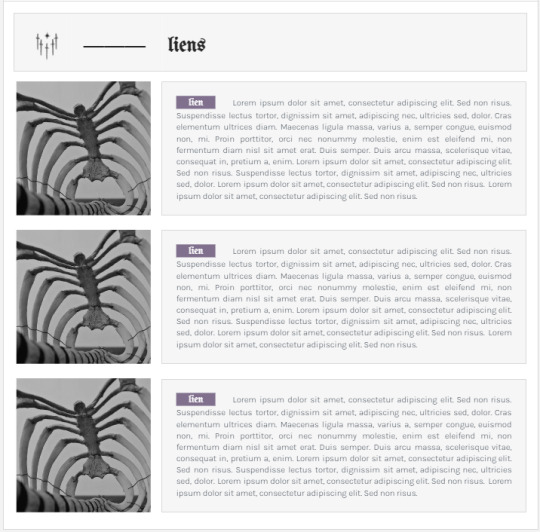
𝟏𝟏 𝐁𝐈𝐒 ⎯⎯⎯⎯⎯ 𝐖𝐀𝐓𝐂𝐇 𝐓𝐇𝐄 𝐓𝐇𝐑𝐎𝐍𝐄 𝐈𝐈 (30 APR. 2024)
ㅤㅤ┍⎯⎯⎯⎯⎯⎯⎯⎯⎯⎯⎯⎯⎯⎯⎯⎯⎯⎯⎯⎯⎯⎯⎯⎯⎯⎯⎯⎯⎯⎯⎯⎯⎯⎯⎯⎯⎯⎯⎯ · · · ·
ㅤㅤㅤㅤPERSONNALISATION : ★★★★★
ㅤㅤㅤㅤDIFFICULTÉ : ★☆☆☆☆
ㅤㅤ · · · · ⎯⎯⎯⎯⎯⎯⎯⎯⎯⎯⎯⎯⎯⎯⎯⎯⎯⎯⎯⎯⎯⎯⎯⎯⎯⎯⎯⎯⎯⎯⎯⎯⎯⎯⎯⎯⎯⎯⎯┛
𝒕𝒆𝒎𝒑𝒍𝒂𝒕𝒆 extrêmement simple et personnalisable, le format 𝐒𝐀𝐍𝐒 𝐅𝐈𝐂𝐇𝐄 a de nombreux avantages comme la possibilité d'écrire autant que possible dans les catégories dédiées sur le modèle ⎯⎯⎯ une véritable révolution pour les grands bavards que vous pouvez être. seul inconvénient : les plus esthétiques d'entre nous pourrons trouver une certaine frustration dans les limites de personnalisation du format 𝐒𝐀𝐍𝐒 𝐅𝐈𝐂𝐇𝐄 puisqu'il est très difficile de manier le déplacement des images en dehors des tableaux. il est néanmoins très utile pour les débutants en matière de gdocs puisqu'il se focalise d'avantage sur le côté pratique de l'application plutôt que sur son côté créatif. quoiqu'il est toujours possible de faire preuve de personnalité avec 𝐖𝐀𝐓𝐂𝐇 𝐓𝐇𝐄 𝐓𝐇𝐑𝐎𝐍𝐄 𝐈𝐈 si l'on est suffisamment imaginatif...
note de stavroguine : j'ai rajouté sur ce 𝒕𝒆𝒎𝒑𝒍𝒂𝒕𝒆 de nombreuses catégories pour ceux et celles qui souhaiteraient enrichir leur fiche. cela passe évidemment par la présence d'un registre de liens, d'une trivia et d'un moodboard, mais également d'une icône musicale personnalisable qui amène à un lien spotify, youtube, etc.
note de stavroguine 2 : il s'agit d'une remasterisation du document 𝐀𝐒 𝐈 𝐖𝐀𝐒 𝐌𝐎𝐕𝐈𝐍𝐆 𝐈 𝐒𝐀𝐖 𝐎𝐂𝐂𝐀𝐒𝐈𝐎𝐍𝐀𝐋𝐋𝐘 𝐁𝐑𝐈𝐄𝐅 𝐆𝐋𝐈𝐌𝐏𝐒𝐄𝐒 𝐎𝐅 𝐁𝐄𝐀𝐔𝐓𝐘 et du document 𝐖𝐀𝐓𝐂𝐇 𝐓𝐇𝐄 𝐓𝐇𝐑𝐎𝐍𝐄, tous les deux remis au goût du jour.
➪ 𝐄𝐗𝐄𝐌𝐏𝐋𝐄 𝐃𝐄 𝐂𝐄 𝐐𝐔'𝐎𝐍 𝐏𝐄𝐔𝐓 𝐅𝐀𝐈𝐑𝐄 𝐀𝐕𝐄𝐂 :


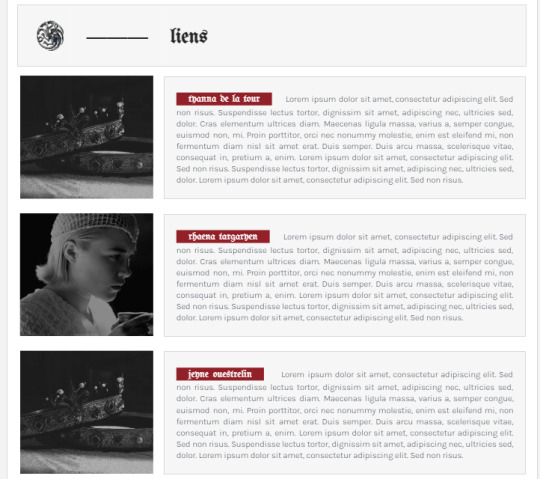
ㅤㅤ 𝑨𝑩𝑶𝑼𝑻 𝑻𝑯𝑬 𝑼𝑺𝑬 ;
ㅤㅤ┍⎯⎯⎯⎯⎯⎯⎯⎯⎯⎯⎯⎯⎯⎯⎯⎯⎯⎯⎯⎯⎯⎯⎯⎯⎯⎯⎯⎯⎯⎯⎯⎯⎯⎯⎯⎯⎯⎯⎯ · · · ·
ㅤㅤㅤㅤGO TO FILE
ㅤㅤㅤㅤAND THEN, SELECT “MAKE A COPY”
ㅤㅤㅤㅤDON’T REMOVE THE CREDITS.
ㅤㅤ · · · · ⎯⎯⎯⎯⎯⎯⎯⎯⎯⎯⎯⎯⎯⎯⎯⎯⎯⎯⎯⎯⎯⎯⎯⎯⎯⎯⎯⎯⎯⎯⎯⎯⎯⎯⎯⎯⎯⎯⎯┛
ㅤㅤ 𝗟𝗜𝗞𝗘&𝗥𝗘𝗕𝗟𝗢𝗚𝗦 are appreciated.
#google docs#template#gdocs#rp template#oc sheet#rp resources#gdoc template#discord template#character sheet#discord roleplay#google docs template#oc template#character resources#google doc template#character doc#gdocs template
836 notes
·
View notes
Text
Can't Sleep
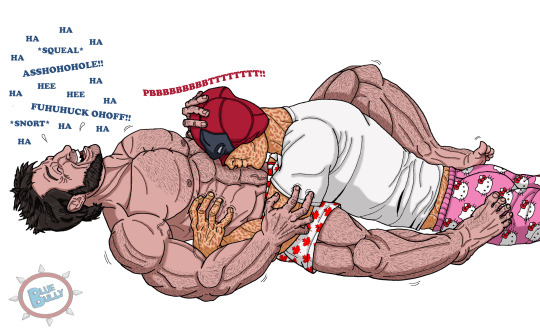
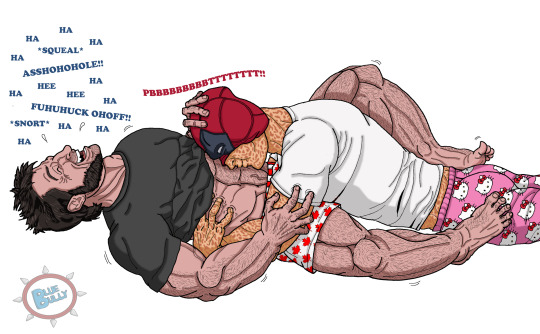
UPDATE 11/16/24 - I made an alternate version with Logan wearing a t-shirt. I was going to draw it like that that originally, but I couldn't resist making him bare-chested because I love drawing muscles. 🤭 But I also like the idea of Wade having to push his shirt out of the way to get unobstructed access to his belly so you get both now. Double the fun! lol
Logan suffers from insomnia, but Wade knows just what will help. Tickle him to pieces until he's completely exhausted and the laughter has filled his mind with endorphins. 😊 Logan tries to avoid letting Wade know he's having trouble sleeping because he's so ticklish, but in the end he's happy to get caught. 💗💛 The tummy raspberries absolutely kill him. 😆
Yeah ok, I spent waaaaay too much time on this, but I'm pretty satisfied with it for the most part. I think I redrew Logan's right leg ten times before I gave up so don't focus on that too much or any other anatomy goofs I made. 😅 Hands and feet are always a bear.
Plus I had to look at many, many pictures of shirtless Hugh Jackman to try to get his muscle structure accurate as best as I could, along with his little arm veins and that one on his lower belly. *sigh* The things I do for you guys. 😏
No background. Too lazy. Just imagine they're on a bed, or wherever Logan decided to try to sleep. lol
(Again if you click the pic to enlarge it then right click the pic and select 'Open Image In New Tab' then you can see it in larger format.)
I hope you guys love it!! 🙏 (I know a lot of you guys just hit the Like button and move on, but feedback and comments are really appreciated by us writers/artists. 💗)
#Finally finished#Logan loves the tickles#tummy raspberries#ticklish!wolverine#ticklish!logan#ler!deadpool#ler!wade#deadpool tickle#wolverine tickle#my art#tickle art#ticklish raspberries
184 notes
·
View notes
Text


❛ 004 , CRACKED POMEGRANATE . . . moody masterdoc template: 8 pages, single muse, used for keeping all of a character's information in one document. includes a title page with a list of contents, a "basics" page for the character's main information and their major character beats that have to exist in every AU they're in, a 2 page personality section (for paragraphs and lists alike), a 2 page appearance section (for paragraphs and lists as well), a connections page to showcase characters they know in every AU they're in, and a links section for related documents or links. this document is not mobile friendly due to the drawings it uses for the titles. if you intend on editing most of the images, you will need a PC and an editing software of some sort to get the gradient affect - apps with a "gradient map" effect will also work. the page is letter size (8.5'' x 11'') in landscape format. if you're using, please keep the credit in the "Links" section and consider a like and reblog. goes a long way to help creators out. model used: tanya ravichandran hexcodes for the images, darkest to lightest: 1b0000 - redblack 150000 - redblack 081f02 - green 3b241b - brown 651b29 - deep red b61936 - pinkred c4496c - pink bb9c50 - yellow fff5ce - yellowwhite HOW TO USE select the 'file' button. from there, you'll find the 'make a copy' button. click it, and then you can name your doc and go from there! do not request access. this doc uses a few tables so i suggest having some knowledge on how they work if you plan on editing anything about the appearance of them. i also recommend keeping your text around the same number of lines as shown in the template. it prevents the doc from going all wonky! to edit the images, select your own image and edit it within a separate software. be sure to maximize the gradient effect with the listed hexcodes above. click the original image and select the "replace image" button. i suggest making sure the images you want to add are a similar style to the original - make the cut-outs from the original into your own cutouts, make the full images from the original your own full images. the titles/hollowed text for each section are done using google drawings. if you'd like to edit them, double click the text, and you'll be in drawings. double click the first letter and change it to the one you'd like, and do the same with the other part of the word. photos in the 'connections' section are also created in drawings. they can be replaced by double clicking the picture, then once you're in drawings you can select the photo, select 'replace image,' and set it to the one you'd like instead. the pink star symbols/emojis are for inserting links. copy your link, highlight the star, click the little 'insert link' button beside the highlighter button, and insert your link. after that you should be good to go! if you have any questions or issues that arise, please let me know. have fun!
#google docs#google docs template#roleplay#rp resources#rp template#oc template#oc sheet#character template#roleplay resources#rp doc template#rp docs template#gdocs#gdocs template#templates#roleplay template#roleplay blog#writing template
226 notes
·
View notes
Text
How I make my Covers and Dividers

Hi.👋 So, the idea to make these posts came about because @cat1705 asked me in private how I made my dividers and that made me wonder if other people would be interested in knowing how I made my covers and dividers. I made a poll and a lot of people were interested in knowing how I made them.
I make them in Canva, so anyone can make them, but I would like this to be more of a help for you to create your own and not for you to do exactly like me. Even though I'm always playing around with the font and the way I place the images, I have a guiding line, so to speak, and that's what I'm going to try to show you.

👉COVERS
Well, first things first, apparently I use the dimensions of an Etsy cover photo template. I just chose it because the dimensions looked good. Choose any one and delete all the elements in it until you have only the white background.
To make covers with several characters I use these frames that serve to drag the image inside and adjust it within the defined limits.
I always use only official images from the game so as not to steal anyone's fanart. I usually get the images from the wikis.
You can also upload the image by just dragging it.


To make sure the title won't cover the characters' faces, I put some temporary text on top to adjust the images.
After uploading the image, drag it to the correct frame and drop it.
To adjust the image, double-click, enlarge, rotate, reduce and move it as you wish. When you think it is ready, click outside the image or press the enter key.

When the image is ready, I remove the text and download the image with the characters.
To download, click the button in the top right corner that says "Share". Then click on "Download", the first button on the last line. It should already be in PNG format, so you won't need to change it.
Attention: If you have more than one page: in "Select pages" choose the option "Current page", click “Done” and only then click on "Download". Otherwise, you will download ALL the pages you have and not the specific one you want.
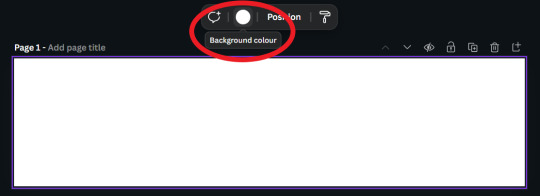
On another page I usually have a gradient background and a little frame. I make the gradient by clicking on "Background color" and in "add a new color" there is the option "Gradient". I don't remember where I got the frame I use, but you can look for some free ones in "Elements".

Use the colors that you think look best, I usually put the light color in the center and the dark color at the ends. For this example I will use white and a golden yellow.

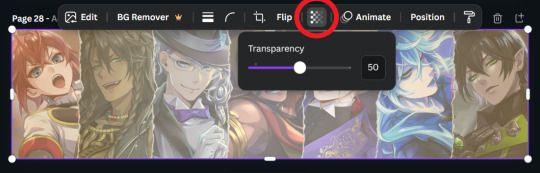
Then, I upload the previous character image and make it 50% transparent. On top of the white frame too (It's just my thing, I don't have a reason to do it, I just think it looks good)
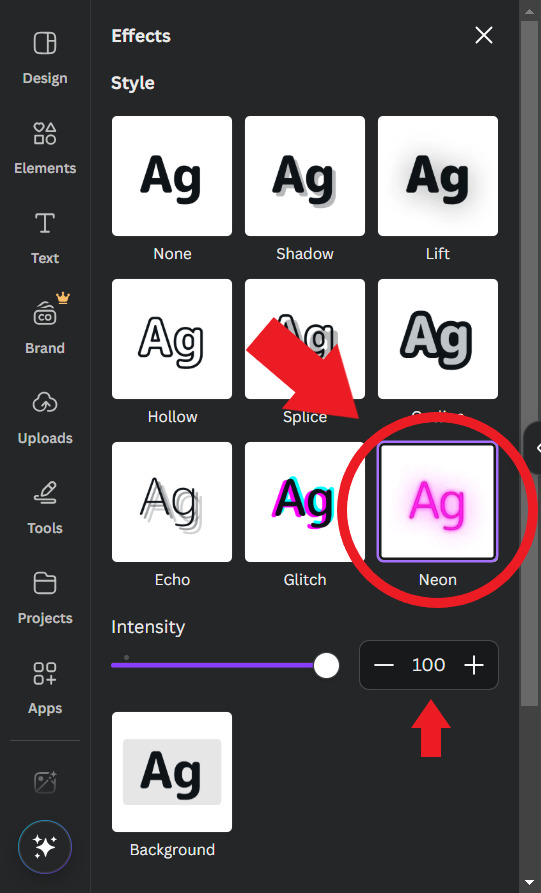
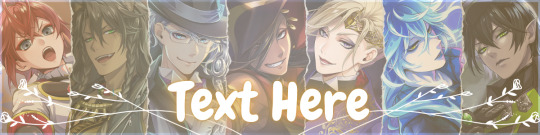
Then I'll put the title. I usually use the "Chewy" font. The font size depends on the size of the title I decided to give it, but it's usually around 80/90. And I add the Effect: "Neon"

To finish, I look for some images in "Elements" to decorate a little more. Searching for "line art" is usually a good tip.
When you're ready, download the image and you're done.
.
👉CHARACTER DIVIDERS
The dividers follow a similar pattern to the covers to match. Create a new page with the same background color gradient.
For the background, I use game backgrounds that match the theme of the fic. For this example, I'm going to make a generic Riddle divider with an image of his room with transparency at 50%.

Then I reduce the height of the image until it is half the height of the canva and place it in the center. Remembering that you can adjust the image by double clicking.

I keep the color of the ends the same, but I adjust the color of the center to the color of the dorm to which the character belongs. In this case, red from Heartslabyul. But I will leave an image with the colors I use for each room, taken from the colors of their personal icons.

For the character name, copy and paste the title, as the font and effect is the same, and adjust to the size of the divider.
And also change the color of the letters to the dorm color.

Then I upload the png image of the character's chibi that can be found on the wikis. In this case I'll use the chibi with Riddle's dorm uniform.
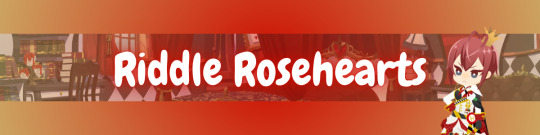
I crop the image to help me orient myself better, but you don't need to do that.
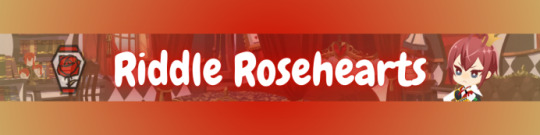
Then I upload the character's personal icon, also found on wikis, adjust the size and set the transparency to 60%.
To finish, I download the image and crop the top and bottom in Paint.
Yes... in Paint... it works ok, shut up!

.
👉LINE DIVIDERS
Finally, for the line dividers, you can copy the Cover because the background colors are the same and erase everything except the image with 50% transparency.

Then I cut it in half, like in the character divider, and again in half to make it thinner, and I place it in the middle of the canvas. (These measures may not be exactly the same as the ones I use today, but the logic in the beginning was this.)

I replace the image with one that seems to fit the theme of the fic. You can do this by dragging it. I usually use game backgrounds, but when none of them seem to look good I look for images from Canva, in "Elements"
That's what I'm going to do to show you. In Elements, write what you want to search for, I'll simply write "background" and choose one of the images without the crown icon (this icon means it's a paid image).
I'll choose any one.


Then I upload the personal icons of the characters that are the focus of the fic. For this example it's the overblot students (because they're my favorite)
Drag them in, place them in a line and adjust the size to that of the line. You can do this one at a time or all at once by selecting them all.
When it's just one character I put one icon upright and the one on the side upside down.

To repeat the pattern, select all of them, copy, paste, and drag until the new set is next to the first. Repeat until the entire line is filled.

Then select all the icons again and set their transparency to 50%.

And finally, download the image and crop the top and bottom parts in Paint. Or wherever you want.
Aaand... I think that's it.
If there's anything you'd like me to explain better, you can ask in the comments. I hope you enjoyed it and that it can help you if you create your own covers and dividers.😘
83 notes
·
View notes